My Blinkies


Stuff


Designers I CT for


Blogs I support

CU Licenses I hold


Networked Blog

Blogroll
-
-
Still around and still busy2 weeks ago
-
Midnight Garden Blog Train Freebie!3 weeks ago
-
Dayz of Summer - Tagger10 months ago
-
-
Country Christmas 20202 years ago
-
Blessed2 years ago
-
-
-
StellaFelice7 Taggies6 years ago
-
February 2020 New Releases6 years ago
-
-
MB&SW Masks 126 and 1276 years ago
-
MASKS #21 and 227 years ago
-
-
CA Girl Exclusive - kit8 years ago
-
-
-
PTU KIT SUMMER CITRUS10 years ago
-
STORE CLOSING DOWN SALE11 years ago
-
Gothic Ashley CT Results11 years ago
-
Rocking Shamrocks11 years ago
-
HELLO AND HAPPY NEW YEAR11 years ago
-
-
Glorious Autumn11 years ago
-
Announcement12 years ago
-
4 New Animations12 years ago
-
New Packs/Kits up in Zone Store ..12 years ago
-
New kit!! "Girlie Girl"12 years ago
-
***Dnscraps, Little Crown***12 years ago
-
"Hope for Brady" 2013 Blog Train!13 years ago
-
Lucky Me - Tagger Size13 years ago
-
Sweet Love PTU13 years ago
-
sassandswagtemps13 years ago
-
CT Tag and New Template13 years ago
-
Serg Grafik satc “All You Need is Love”13 years ago
-
Sexy Biker Babe - Kit By NAC13 years ago
-
Pirates Wanted - tag13 years ago
-
SWA is Re-Opening !14 years ago
-
Blogwear Design TOU14 years ago
-
-
♥Miraculous Moment♥15 years ago
-
-
-
-
-
-
-
-
-
-


Saturday, January 28, 2012
Striking ~~ Extras

I used the fabulous art of ©Jennifer Janesko used with a license from CDO .
Scrap kit by Irenea Alexeeva
Here are extras.
No Drama (PTU) using Alika's Scraps (Extras)

This tutorial was written entirely by me, using PSP9, any resemblance to any other is purely coincidental.
This tutorial should work with any version of PSP.
This tutorial is written with the belief that you have a working knowledge of PSP, but is also suitable for beginners.
Materials you will need:
Scrap Kit of choice, I used No Drama Allowed by Alika's Scraps.
Tube(s) of choice, I used the art of ©Verymany this work requires a license which may be purchased at PFD.
Mask of choice, I used one that I made, and it may be found here.
Flame brush of choice, here is the one I used. It was made specifically for use with this kit.
Font of choice, I used Alfred Drake
Let's get started.
Open a new image, 750x750 you will re-size later.
Choose glitters from your kit I used both from this kit. Copy and paste as new layers until there is glitter scattered all over your image.
Pick a paper from your kit, copy and paste as a new layer into your image.Apply your mask and merge the group.
If you choose you may use white as both colors you may use a flame brush to adjust some extra "flames" around your mask layer.
Place one of the film strips from your kit then using the magic wand tool the inside of each square.Use your deform tool to rotate and position.
Using the tube or tubes of choice and copy and paste as a new layer a close up of your tube into each square inverting and deleting after each (re-invert between each placement).
Select none. Duplicate each close up, and on each use a Gaussian blur of 2 then change the properties to overlay.
On each original layer use the colorize tool to make the tube a color to match your kit.
Now add a drop shadow of choice to your film strip layer.
Choose a ribbon from your kit and place beneath the film strip layer and position as desired add the drop shadow, then duplicate.
Move the duplicate layer above your film strip layer and use your erase tool to "wrap: the ribbon around the strip.
Place a swirl type element above the Mask layer, and you may do the same with others beneath the mask layer. Follow your vision.
Using your flame element place around your film strip for the desired effect. duplicate and re-size by 80 place another by the other side of the strip as well.
Now place your tube or tubes around the flames and film strip as desired.Add a drop shadow and use your erase tool to suit.
Using your lips or "kiss" element and re-size by 50 twice. Add a drop shadow and position as desired. Duplicate and mirror. Reposition the duplicate layer to suit.
Using word art from your kit re-sized as necessary. You may use a drop shadow here as well.
Now re-size, add your copyright and your name.
Thank you for trying my tutorial.
Here are some Extras.
Wednesday, January 25, 2012
Bubble Fairy (PTU) using Horsedreamn Designs (Extras & Stat)

This tutorial was written entirely by me, using PSP9, any resemblance to any other is purely coincidental.
This tutorial should work with any version of PSP.
This tutorial is written with the belief that you have a working knowledge of PSP, but is also suitable for beginners.
Materials you will need:
Scrap Kit of choice, I used New Beginnings by Horsedreamn Designs.
Tube of choice, I used the art of ©Melissa Dawn which requires a license which may be purchased at CDO.
.
Mask of choice, I used WSL_Mask152, and it may be found here.
Font of choice, I used Beyond Wonderland
Filters:
EyeCandy ~Gradient Glow~
Let's Begin:
Open a new image 750x750 you will re-size later.
Open a paper from your kit I used paper 10. copy and paste as a new layer into your image, re-size as necessary.
Add a Gaussian blur of 3 (adjust, blur, Gaussian blur). Apply your mask (Layer, load/save mask).
Merge the group (Merge, Merge group).
Choose a frame from your kit (I used Frame/element 10) re-size as needed I re-sized by 50 then by 80. Add a drop shadow of3,3,70,12. You may choose to add a gradient glow to this as well , I didn't.
Pick a glitter from your kit I used element 11 re-size as needed - re-size 80 then duplicate and re-sized 80 again then flip and mirror.
Add a gradient glow with these settings.


Now move these layers beneath your group mask layer.
Just above these layers copy and paste as a new layer a butterfly element from your kit I chose element 15 re-sized by 20 twice.
Add a gradient glow and position around your glitter layer. Duplicate and mirror and position near the other glitter element.
Choose ribbon and string elements re-size as needed I re-sized varying between 60-80, if necessary use your deform tool to achieve the desired effect.
Flip and mirror these elements until you achieve the desired effect then add the same drop shadow as above.
Pick your flower elements re size 20-25 once or twice until you achieve your vision, add a drop shadow and-position.
You may use my tag as a guide, or go your own way... this is about creativity.
Place your tube and both drop shadow and gradient glow. Duplicate and move the duplicate level above the frame level.
Using your erase tool erase any bits to assist in blending your tube well.
Re-size add your copyright and your name you have completed my tutorial.
Thank you for trying my tutorial.

Tuesday, January 24, 2012
Snooki (PTU) using Wicked Princess Scraps (Extras & Stat)

This tutorial was written entirely by me, using PSP9, any resemblance to any other is purely coincidental.
This tutorial should work with any version of PSP.
This tutorial is written with the belief that you have a working knowledge of PSP, but is also suitable for beginners.
Materials you will need:
Scrap Kit of choice, I used Snooki by Wicked Princess Scraps.
Tube of choice, I used the art of ©FourXsDesigns. You need a license to use this work you may purchase one at PTE.
Mask of choice, I used on called Vix_Mask226. You may download this mask here.
Font of choice, I used Lovers Quarrel ROB (PTU)
Let's get started.
Open a new image 750x750. You will re-size later.
copy and paste a paper from your kit I used paper 9. Next apply your mask, Layer, load/save mask. Then merge, Merge group.
Next take the film strip element re-sized 80. Next take the city scene re-sized 90, and place beneath the strip layer.
Go back to the strip layer and using your magic wand tool click within each of the larger squares.
Copy and paste as a new layer a copy of your tube within each square inverting and deleting after arranging each tube within the space.
Now going to each layer use your colorize tool to color the tube each one a different color.
Merge each layer after colorizing all four until they are all on layer, and move this layer beneath the film strip layer, but above the city scene.
Alter the opacity until the city scene is slightly visible. Approximately 76.
Place your main tube as desired.Add a drop shadow and duplicate. on the duplicate layer add a Gaussian blur, go to adjust, blur, Gaussian blur 3.
go to properties and change the blend to overlay.
using the cherry element and lips element re-sized by 50 twice. using your cherry element place on the film strip twice as desired ( you may use my tag as a guide)
then duplicate the element and place a second element to compliment. Now duplicate each of those and move beneath the film strip layer.
going back to the two original layers and using your erase tool erase portions of the elements to "hang" on the strip layer.
Go back to the lips element and place and then duplicate twice and arrange the three elements as desired.Add a drop shadow the elements as desired.
Choosing the elements desired re-size varying between 40 and 70, and using the deform tool as needed begin placing them around your film strip.
Use the deform and erase tools to help position the elements in a desired manner.
If you choose to follow my tag as a guide, to position the shoes free rotate one shoe (re-sized by 50 twice)90 to the right, then using the deform tool rotate more until you achieve the desired affect.
Duplicate, under the duplicate layer place another shoe element re-sized in the same manner between the two rotated elements.
Add any desired drop shadows. With the erase tool erase parts of the duplicated rotated shoe element until it looks partially in front of the upright shoe layer.
For the musical notes place the element above the group mask layer re-sized 80 and duplicate and re-size the duplicate layer 80 again.
On both layers adjust the opacity until the desired effect is achieved.( Approximately 72)
You may use my tag as a guide, but always try to explore your creativity.
Re-size, add your copyright and your name.
Thank you for trying out my tutorial.

Sunday, January 22, 2012
Sexy Bad Girl (PTU) using Alika's Scraps (Extras & Stat)

This tutorial was written entirely by me, using PSP9, any resemblance to any other is purely coincidental.
This tutorial should work with any version of PSP.
This tutorial is written with the belief that you have a working knowledge of PSP, but is also suitable for beginners.
Materials you will need:
Scrap Kit of choice, I used Sexy EMOstyle by Alika's Scraps.
Tube of choice, I used the art of ©Tim Lowery. You need a license to use his work you may purchase one at PTE.
Mask of choice, I used on called Nik-Sloth. I'm not sure where I got this mask, but if it is your creation please contact me so I can credit you.
Template of choice, I used one that I made and you may download it here.
Gradient(s) of choice.
Font of choice, I used A&S Blaze.
Filters needed:
EyeCandy 4000~Gradient Glow~
Let's get started:
You may open and duplicate your template, closing the original and deleting the credit information.
Choose a paper from your kit, I chose paper 9, copy and paste beneath all of the shapes layers.
Apply your mask of choice, Layers, Load/Save mask, then merge, merge group.
Now copy and paste your star glitter element either element79 or 80 move it beneath the mask layer and duplicate then flip.Adjust as necessary for effect.
Now on your black rectangle go to effects, texture effects, tile You may use your own setting or apply mine
with a color from your tube.
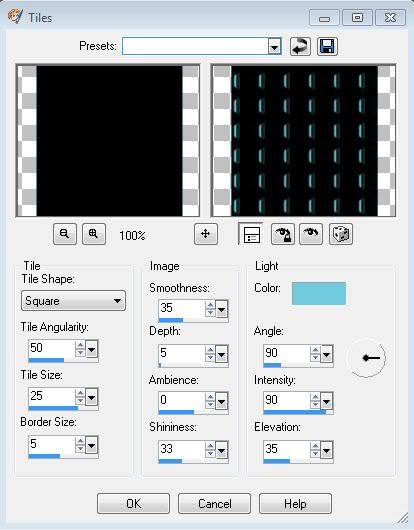
Apply your drop shadow and gradient glow of choice.
Next rotate the Aqua Rectangle layer and rotate 90 using the free rotate. Using your magic wand tool select this rectangle,and flood fill with your gradient of choice Select none.
Add your drop shadow and gradient glow to this layer too.
Next using the heart scatters elements 75 or76 paste as a new layer, use your deform tool to fit into the rectangle area, add a gradient glow, duplicate and flip.
Move the flipped layer to compliment the original layer.
Next above the black star layer use one of the fence stars elements 72,73 or74 and place adding your drop shadow, I used 0,0,70, 10.
Now place the triple stud layer across your horizontal rectangle layer re-size as necessary. duplicate this layer.
Next take one of the Ankh crosses(elements 61, 62 & 63) and place between the two layers.
Going to the duplicate layer of the studs erase areas to make it appear that the ankh is hanging on the stud.
You may also erase the the third stud, unless you decide to place an element. I erased it on both layers.
add your drop shadow to the ankh layer.
Add a heart dangle and "hang" from the second stud in the same manner as the ankh, add your drop shadow.
Next "hang" the spiked ring just above the dangle in the same manner.
Now on the larger circle using your magic wand select the lighter area within the circle, flood fill with a lighter gradient than used on the horizontal rectangle.
Next paste a close up layer of your tube then invert delete select none. Duplicate this layer on the duplicate layer colorize this layer a complimentary color to your tag.
Then adjust, blur, Gaussian blur, 3. go to properties and change the blend mode to overlay. Go back to original layer and change the Blend properties to Luminance (Legacy).
Repeat the selection and placement of the tubes steps with the smaller circle using a different part of your tube, but all the same settings used on the larger circle.
Adjust the Opacity on these layers as desired I adjust all tube layers on the circles to 70.
Now place your tube layer beneath the heart dangle layer and add your drop shadows and duplicate. Move the duplicate layer above the heart dangle layer.
Using your erase tool erase bits of your duplicate tube layer to make it appear as though the hear is "between" the legs of your tube.
Now you may place complimentary elements on your tag. Re-size and use your deform tool as necessary to adjust element size.
add your drop shadow and gradient glows as desired.
As always you may use my tags as a guide, but be as creative as you'd like to suit your tag.
Once you have added your desired elements and adjusted them as necessary, Re-size your tag, add your copyright and your name.
You have completed my tutorial, Thank you for trying it out.
Here are extras for those that use them.
And for Incredimail users here is a complimenting stat.

Fairy World (PTU) using Wicked Princess Scraps (Extras & Stat)

This tutorial was written entirely by me, using PSP9, any resemblance to any other is purely coincidental.
This tutorial should work with any version of PSP.
This tutorial is written with the belief that you have a working knowledge of PSP, but is also suitable for beginners.
Materials you will need:
Scrap Kit of choice, I used Wishes for the World by Wicked Princess Scraps.
Tube of choice, I used the art of ©Kurama Phoenix which requires a license which may be purchased at here.
.
Mask of choice, I used Vix_BigMask019, and it may be found here.
Font of choice, I used
Filters:
EyeCandy ~Gradient Glow~
Let's Begin:
Open a new image 750x750 you will resize later.
Copy and paste a paper choice into your image I used paper2, and apply a mask (Layers, Load/Save mask,)
then Merge the group (merge, merge group).
Next choose a frame from your kit I used bow tie frame, copy and paste above the group layer.
Using the magic wand tool click inside each opening. Modify, expand by 3.
Now choose either another paper or a background (I used the jpg background of my tube) and paste as a new layer,
position as desired and invert and delete. Select none. Move beneath the frame layer.
Go back to the Frame layer and add your drop shadow, I used 0,0,70,10.
Now Place your tube as desired adding a drop shadow and gradient glow as desired.
It is time to select and place your elements.
I started with the butterfly elements and added a drop shadow & gradient glow then duplicated and mirrored.
Move one layer just above the group layer and position around your frame and background layers.
Next I chose the leaf branch element resized 70 using the deform tool and duplicating to fit the needs of the tag.
Repeat this with the pansy vine element. Adding various drop shadows and or Gradient glows to each of the leaf and pansy layers.
Next resize your tag, add your copyright and you name.
You have completed my tutorial.
Thank you for trying it out.
There are Extras for those that would like them
Here is a Stat/letter for Incredimail users.

Saturday, January 21, 2012
Lovely (PTU) using CBJ Scraps (Exclusive) (Extras & Stat)

This tutorial was written entirely by me, using PSP9, any resemblance to any other is purely coincidental.
This tutorial should work with any version of PSP.
This tutorial is written with the belief that you have a working knowledge of PSP, but is also suitable for beginners.
Materials you will need:
Tube of choice, I used the art of ©Zindy S.D. Nielsen which requires a license which may be purchased at Zindy Zone.
Mask of choice, I used MaskCris19, I'm not sure where I got the mask, so if it is yours please contact me so I can credit you.
Font of choice, I used Volutes.
Filters:
EyeCandy ~Gradient Glow~
Let's get started!
Open a new image 750x750, don't worry you will resize later.
Next choose a frame from your kit, I chose the cluster frame.
Next using your magic wand tool click inside each of the squares of the frame.
Selections, Modify, Expand by 2. Now choose a paper from your kit I chose paper8.
Paste as a new layer, invert and delete, select none. Move this layer beneath your Frame layer.
Go back to your frame layer and add your drop shadow I used 0,0,80,10 and a gradient glow of choice.
Next you may place your tube as desired adding a drop shadow and a gradient glow.
Now begin placement of your elements, Start with the petals element resized 70, and duplicate and resize as needed and position as desired behind your tube.
Next place the heart scatters elements beneath your tube, or in a complementary position.
Next resize and place a ribbon element, I resized 70 and duplicated and mirror with each element you may add a drop shadow or a gradient glow as desired, or both.
Now resize your lovely element resized (I used 70) as needed use your deform tool achieve the result you desire.
Next you can take your clock element resized 70 and adjust using the deform tool.
Now take the crystal heart element and place above your clock element duplicate mirror and merge down.
Next place the ribbon elements beneath the clock element resize as necessary.
Now resize your tag, add your copyright and your name.
You have now completed my tutorial.
You may download extras here if you'd like.
Here is a complimentary Stat for Incredimail users.

Subscribe to:
Posts
(Atom)

Licenses I hold


CLOSED STORES:


Counter
|

