My Blinkies


Stuff


Designers I CT for


Blogs I support

CU Licenses I hold


Networked Blog

Blogroll
-
-
Still around and still busy2 weeks ago
-
Midnight Garden Blog Train Freebie!3 weeks ago
-
Dayz of Summer - Tagger10 months ago
-
-
Country Christmas 20202 years ago
-
Blessed2 years ago
-
-
-
StellaFelice7 Taggies6 years ago
-
February 2020 New Releases6 years ago
-
-
MB&SW Masks 126 and 1276 years ago
-
MASKS #21 and 227 years ago
-
-
CA Girl Exclusive - kit8 years ago
-
-
-
PTU KIT SUMMER CITRUS10 years ago
-
STORE CLOSING DOWN SALE11 years ago
-
Gothic Ashley CT Results11 years ago
-
Rocking Shamrocks11 years ago
-
HELLO AND HAPPY NEW YEAR11 years ago
-
-
Glorious Autumn11 years ago
-
Announcement12 years ago
-
4 New Animations12 years ago
-
New Packs/Kits up in Zone Store ..12 years ago
-
New kit!! "Girlie Girl"12 years ago
-
***Dnscraps, Little Crown***12 years ago
-
"Hope for Brady" 2013 Blog Train!13 years ago
-
Lucky Me - Tagger Size13 years ago
-
Sweet Love PTU13 years ago
-
sassandswagtemps13 years ago
-
CT Tag and New Template13 years ago
-
Serg Grafik satc “All You Need is Love”13 years ago
-
Sexy Biker Babe - Kit By NAC13 years ago
-
Pirates Wanted - tag13 years ago
-
SWA is Re-Opening !14 years ago
-
Blogwear Design TOU14 years ago
-
-
♥Miraculous Moment♥15 years ago
-
-
-
-
-
-
-
-
-
-


Saturday, November 10, 2012
Starlight Frost Extras

Extras featuring Starlight Frost the charitable kit for Taking Back PSP from Wicked Princess Scraps.
You can find the cluster used in this tag further down the page.
Wednesday, November 7, 2012
Freebie Cluster featuring Starlight Frost by Wicked Princess Scraps

Grab this cute little freebie from Starlight Frost by Wicked Princess Scraps for the Taking back PSP Project.
Saturday, October 27, 2012
Fairy Gatherer featuring Fall in the Park

This is a great fall kit for your tagging needs.
Sunday, October 21, 2012
Breathe featuring Colour Me & PinUpToons (PTU)

This tutorial was written entirely by me, using PSP9, any resemblance to any other is purely coincidental.
This tutorial should work with any version of PSP.
This tutorial is written with the belief that you have a working knowledge of PSP, but is also suitable for beginners.
Materials you will need:
Scrap Kit of choice, I used Colour Me by TLP Designz.
Tube of choice, I used the art of ©PinUpToons which requires a license which may be purchased at CDO.
Mask of choice, I used one I made, and you may get it here.
Word Art of choice, I used one from Create with TLC, you may find it here.
Garadient of choice. I made one using colors from my tag.
Font of choice, I used Water Brush Rob.
Filters:
Xero ~~ Radiance
Xero ~~ Porcelain
EyeCandy 4000 ~~ Gradient Glow
Let's begin.
Open a new image, 750x750 you will re-size later.
Copy and paste a paper into your image and apply your mask.
(Layers, Load/Save Mask, Apply mask from Disk)
Merge the group.
(Layers, merge, Merge group)
Now add a Gaussian blur of 4.
(Adjust, Blur, Gaussian Blur)
Begin placing elements and add a drop shadow, I used 3,4,50,12
Place your tube and add the drop shadow the add an additional drop shadow -3,-4,50,12.
Next apply Radiance with these settings:

You can change the setting to suit your tube.
Now apply Porcelain with these settings:

Again you can play with the settings until you find what works with your tube.
You may add a gradient glow to your tube and to any elements as you see fit.
Finish placing your elements as desired.
Now place and re-size your word art as necessary.
Select all, float and defloat then flood fill your word art with a gradient of choice then de-select.
Now add a drop shadow of choice then add a gradient glow of choice to match your tag.
Now re-size add your copyright and your name.
Thank you for trying our my tutorial.
Thursday, October 18, 2012
Wistful featuring Autumn Romance & Zebrush (PTU)

This tutorial was written entirely by me, using PSP9, any resemblance to any other is purely coincidental.
This tutorial should work with any version of PSP.
This tutorial is written with the belief that you have a working knowledge of PSP, but is also suitable for beginners.
Materials you will need:
Scrap Kit of choice, I used Autumn Romance by Honored Scraps.
Mask of choice, I used WSL_Mask363, and you may get it here.
Font of choice, I used Hummingbird.
Filter:
Zero ~~ Radiance
EyeCandy 4000 ~~ Gradient Glow
Let's begin.
Open a new image, 750x750 you will re-size later.
Copy and paste as a new layer a paper from your kit.
Apply your mask (Layers, Load/save mask, Load mask from disk).
Merge (Layers, Merge, merge group).
Copy and paste a frame into your image and position as desired.
Add a drop shadow of choice or you may use these setting; 4,6,55,13.
Copy and paste your tube into your image, add your drop shadow and postion as desired.
Apply Radiance with these settings:

You may choose other settings for your tube just play until you get what you like.
Duplicate your tube and move the original layer beneath your frame and the duplicate above it.
Using your erase tool erase any parts of your tube on both layers outside of the frame until the tube is coming out of the frame as desired.
Begin placing your elements, you may us your manual correct tool to adjust the tones of the kit as needed.

Apply Radiance and or Gradient Glow to some of your elements to highlight them as well.
If you are using my tag as a guide I used radiance on the bird as well as the butterflies
(used Manual color correct & Gradient glow on these too).


Re-size your elements as desired to fit your tube.
Once you have achieved the result you like, re-size, add your copyright and you name.
Thank you for completing my tutorial.
Sunday, October 14, 2012
Watching me featuring To the Moon & Barbara Jensen

This tutorial was written entirely by me, using PSP9, any resemblance to any other is purely coincidental.
This tutorial should work with any version of PSP.
This tutorial is written with the belief that you have a working knowledge of PSP, but is also suitable for beginners.
Materials you will need:
Scrap Kit of choice, I used To the Moon by Crafted by Gina.
Tube of choice, I used the art of ©Barbara Jensen which requires a license which may be purchased at her store.
Mask of choice, I used WSL_Mask133, and you may get it here.
Font of choice, I used Child's Play.
Filters:
Xero ~~ Clarity
Mura Meister's ~~ Copies
Let's begin.
Open a new image, 750x750 you will re-size later.
copy and past a paper from your kit into your image and apply your mask.
(Layers, Load/Save Mask, Load mask from Disk)
Then merge the group. (Layers, Merge, Merge group)
Copy and paste a frame from your kit, and position as desired upon the mask layer.
Using a scatter from your kit, place and position as desired duplicating and mirroring as needed.
Back to the frame layer, using your magic wand tool Click inside one of the frame openings and select then expand by 5.
(Selections, Modify, Expand)
Position different Moon man elements from your kit Using free rotate and the deform tool as needed.
Invert and delete. (to invert Ctrl+Shift+I) then deselect (Ctrl+D).
Repeat as necessary.
If you'd like to have Moonman bits peek through the "window" duplicate and move it above the frame layer and use the erase tool on extra bits.
Add a drop shadow to all. I used 3,3,45,12.
Now begin to place foliage as desired add your drop shadow as needed.
Place some of the flower elements from your kit
On some of the flower elements Add Copies with these settings:

Then on another of the same flower element add the Copies with this settings:

Now place your tube and position as desired apply the Clarity filter with these settings or those that suit your tube:
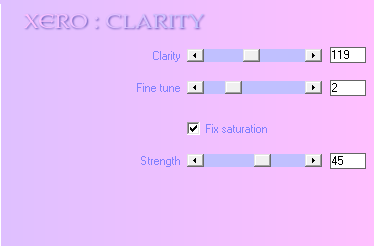
Add your drop shadow twice, then add a drop shadow of -3,-3,45,12.
Duplicate and add a Gaussian blur of 3 (Adjust, blur, Gaussian blur).
Adjust the properties to Overlay (Layers, Properties).
Finish adding any elements you'd like and adjust as needed.
Re-size your tag, add your copyright and your name.
Thank you for trying out my tutorial.
Rockabilly Girl featuring Rockabilly Wedding & Myka Jelina

This tutorial was written entirely by me, using PSP9, any resemblance to any other is purely coincidental.
This tutorial should work with any version of PSP.
This tutorial is written with the belief that you have a working knowledge of PSP, but is also suitable for beginners.
Materials you will need:
Scrap Kit of choice, I used Rockabilly Wedding by Scrappin Krazy Designs.
Tube of choice, I used the art of ©Myka Jelina which requires a license which may be purchased at her store.
Mask of choice, I used WSL_Mask209, and you may get it here.
Font of choice, I used Pixie Moon.
Filters:
Zero ~~ Porcelain
EyeCandy 4000 ~~ Gradient Glow
Let's begin.
Open a new image, 750x750 you will re-size later.
Copy and paste into your image a paper from your kit, and apply your mask of choice.
(Layers, Load/Save Mask, Load Mask from Disk) Merge the group (Layers, Merge, Merge group).
Next take your piano element and using your smudge brush smudge the hard edges a bit then take your curtain element and place as desired.
Merge the two elements and apply the same mask with the steps above.
Place your tube into your image and apply a drop shadow of 4,4,50,12.
Apply Porcelain with these settings:

Duplicate the tube and add a Gaussian blur of 4 (Adjust, Blur, Gaussian blur).
Change the properties on this layer to Overlay (Layers, Properties, Overlay).
Begin placing your other elements, re-sizing as desired adding a drop shadow as needed.
Gradient Glow may also be added with these settings or those of your choice:


When adding a gradient glow, change the colors as needed to compliment your tag.
Once you have achieved your desired result, re-size, add your copyright and your name.
Thank you for trying out my tutorial.
Subscribe to:
Posts
(Atom)

Licenses I hold


CLOSED STORES:


Counter
|

