My Blinkies


Stuff


Designers I CT for


Blogs I support

CU Licenses I hold


Networked Blog

Blogroll
-
🌸 Brick Floral Journal Card Freebie1 day ago
-
Testing4 days ago
-
Festive Wordart for You5 months ago
-
Dayz of Summer - Tagger8 months ago
-
-
Country Christmas 20202 years ago
-
Blessed2 years ago
-
-
-
StellaFelice7 Taggies6 years ago
-
February 2020 New Releases6 years ago
-
-
MB&SW Masks 126 and 1276 years ago
-
MASKS #21 and 227 years ago
-
-
CA Girl Exclusive - kit7 years ago
-
-
-
PTU KIT SUMMER CITRUS10 years ago
-
STORE CLOSING DOWN SALE11 years ago
-
Gothic Ashley CT Results11 years ago
-
Rocking Shamrocks11 years ago
-
HELLO AND HAPPY NEW YEAR11 years ago
-
-
Glorious Autumn11 years ago
-
Announcement12 years ago
-
4 New Animations12 years ago
-
New Packs/Kits up in Zone Store ..12 years ago
-
New kit!! "Girlie Girl"12 years ago
-
***Dnscraps, Little Crown***12 years ago
-
"Hope for Brady" 2013 Blog Train!13 years ago
-
Lucky Me - Tagger Size13 years ago
-
Sweet Love PTU13 years ago
-
sassandswagtemps13 years ago
-
CT Tag and New Template13 years ago
-
Serg Grafik satc “All You Need is Love”13 years ago
-
Sexy Biker Babe - Kit By NAC13 years ago
-
Pirates Wanted - tag13 years ago
-
SWA is Re-Opening !13 years ago
-
Blogwear Design TOU14 years ago
-
-
♥Miraculous Moment♥15 years ago
-
-
-
-
-
-
-
-
-
-
Thursday, July 22, 2010
Sophisticated...
 This tutorial is for those that have a working knowledge of PSP.This tutorial was written entirely by me and any resemblance to any other is purely coincidental. I used PSP 9, but any version should work.
The materials you will need:
This tutorial is for those that have a working knowledge of PSP.This tutorial was written entirely by me and any resemblance to any other is purely coincidental. I used PSP 9, but any version should work.
The materials you will need:
Scrap kit: I used JuciyBits kit Sophisticate that you may find HERE
Tube or tubes of choice: I chose the artwork of Jennifer Janesko
A license is required to use her work. You may purchase one at CILM.
Font of choice: I used Aphrodite Pro
Let's start...
Open up a new image 700 x 700 You may re-size later.
Copy and paste frame of choice I chose frame 2
Using your magic wand click inside the frame
Choose a paper my choice was paper 6, Click Selections, Invert, Delete, Select none
add a drop shadow that suits the frame choice I chose 2, 2, 100, 2 then -2, -2, 80, 6
Using the magic wand again on the frame layer, click inside the frame Selection, Modify, expand by 2
Copy and paste your tube of choice adjust to fit within the frame as you desire
Click Selections, Invert, Delete, Select none
You may add a drop shadow here as well
Move both the paper layer and the tube layer under the frame.
You may now add elements of your choice for embellishment.
I chose to add Ribbon 2 re-sized 65 with a drop shadow of 2, 2, 100, 2 then -2, -2, 80, 6
Then Leaf 2 with a drop shadow 2, 2, 80, 2 then -1, -1, 80, 5, then Duplicate, rotate copy 70,
Then brad 01 re-sized 65
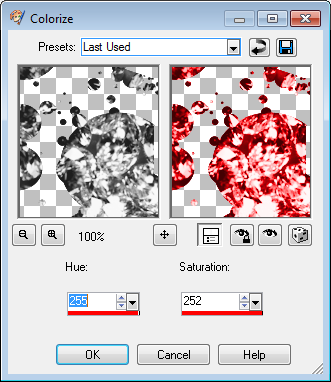
I also chose glitter 2 which I colorized to match a color from my tube
(to do this go to adjust, Hue and Saturation, colorize)
 I placed Glitter under my frame layer, duplicated,
mirror image, then flipped. I added a drop shadow here as well.(-1,-1,80,5)
Now add your copyright information, re-size and and add your name you are all done.
Thank you for completing my tutorial.
Here is one of the results sent to me from this tutorial.
I placed Glitter under my frame layer, duplicated,
mirror image, then flipped. I added a drop shadow here as well.(-1,-1,80,5)
Now add your copyright information, re-size and and add your name you are all done.
Thank you for completing my tutorial.
Here is one of the results sent to me from this tutorial.

Subscribe to:
Post Comments
(Atom)

Licenses I hold


CLOSED STORES:


Counter
|

0 comments:
Post a Comment