My Blinkies


Stuff


Designers I CT for


Blogs I support

CU Licenses I hold


Networked Blog
Blogroll
-
AI Midnight Spellbound Papers5 days ago
-
2025 Update2 weeks ago
-
Good VS Evil - Tagger7 months ago
-
-
PTU 'Mardi Gras Queens' Tubes1 year ago
-
-
Blessed1 year ago
-
-
-
StellaFelice7 Taggies5 years ago
-
February 2020 New Releases5 years ago
-
-
MB&SW Masks 126 and 1276 years ago
-
MASKS #21 and 226 years ago
-
-
CA Girl Exclusive - kit7 years ago
-
-
-
PTU KIT SUMMER CITRUS9 years ago
-
STORE CLOSING DOWN SALE10 years ago
-
Gothic Ashley CT Results10 years ago
-
Rocking Shamrocks10 years ago
-
HELLO AND HAPPY NEW YEAR10 years ago
-
-
Glorious Autumn10 years ago
-
Announcement11 years ago
-
4 New Animations11 years ago
-
New Packs/Kits up in Zone Store ..11 years ago
-
New kit!! "Girlie Girl"11 years ago
-
***Dnscraps, Little Crown***11 years ago
-
"Hope for Brady" 2013 Blog Train!12 years ago
-
Lucky Me - Tagger Size12 years ago
-
Sweet Love PTU12 years ago
-
sassandswagtemps12 years ago
-
CT Tag and New Template12 years ago
-
Serg Grafik satc “All You Need is Love”12 years ago
-
Sexy Biker Babe - Kit By NAC12 years ago
-
Pirates Wanted - tag13 years ago
-
SWA is Re-Opening !13 years ago
-
Blogwear Design TOU13 years ago
-
-
♥Miraculous Moment♥14 years ago
-
-
-
-
-
-
-
-
-
-
Showing posts with label Stacey's Designs. Show all posts
Showing posts with label Stacey's Designs. Show all posts
Monday, June 13, 2011
BBQ

This tutorial was written entirely by me and any resemblance to any other is purely coincidental.
PSP 9 was used to write this tutorial, but any version should work.
Lets begin.
Material you will need are:
Scrap Kit of Choice: I used All American Cook Out by Stacey's Design
Tube or tubes of choice I used the art of ©Gary Ham you must have a license to use his art you may purchase one at CDO.
Mask of choice: I used 221 from Insatiable Dream
Font of choice: I used Kingthings Willow
Open a new image 750x750, you will resize later.
Flood fill with a color from your scrap kit. Click layer load/save mask and apply your mask. Merge merge group.
open a new raster layer flood fill with another color from your kit and repeat the steps above then image resize unclick resize all layers
and resize the layer 60. Repeat this step with another color from your kit and resize 40.
Now start choosing your elements from your kit. I chose the picnic table and the lounge chair resized 80 and added a drop shadow of 3,3,100,13.
You should resize according to your preference and placement of elements. Next I chose the grill resized 80 as well I duplicated this and put the same drop shadow on the copied layer.
I move this layer beneath then placed a background of my tube and the tube above each layer with the tube being on top of the original grill layer. Using my erase tube I erased what I didn't want from my background art.
Next I used the erase tub on the original grill layer to fit my tag.
On my tube I added the 3,3,100,13 drop shadow. Next I added the triple frame using the magic want tool select inside each of the frames and then create new layer flood fill with color of choice then invert and delete. move this layer beneath your frame layer.
now invert again and repeat the process using various tube from your artist inverting and deleting each time and re-inverting after each tube. Finally you will choose other elements to complement your tags resized as desired. I chose button, the cooler the umbrella, utensils, beer, chips, soda and tanning lotion all resized to fit my tag.
Now resize as desired, add the copyright information and you are done. Don't forget to add your name.
Thank you for completing my tutorial.
Sunday, January 30, 2011
Emo

This tutorial is written for those with a working knowledge of PSP.
It is also written entirely by me and any similarity or resemblance to any other is purely coincidental.
I used version 9 for this tutorial but any should work.
Materials needed:
Scrap kit of choice I used Housewarming Party by Stacey's Designs.
Tube or tubes of choice I used the art of Rion Vernon~~ ©PinUpToons you need a license to use his work, you may purchase one at CDO.
Font of choice I used Moonstar
Filters needed:
EyeCandy Gradient glow
Let's get started.
Open your new image 750x750 you may resize later.
Choose a frame from your kit, I chose the string frame.If you choose a frame similar to mine then alternate papers from your kit.
Click inside the area of the frame desired using your magic wand tool copy and paste your papers as a new layer.
Invert, delete, invert if you want to use another paper or select none if you are done I chose papers 1 & 2.
Move the paper layer or layers under your frame layer, and add a drop shadow to your frame, 2,2,80,12.
Now add your tube as desired to suit you add a drop shadow and gradient glow as desired.
Now I chose both fairy dus from my kit and i placed them under the paper layer and added a gradient glow with the settings 3,25,70, thin, #ffffff, 100
Next I chose the sun and moon element resized 70 and placed under my frame layer. Add a drop shadow 1,1,80,1
then a gradient glow with the settings above, but a complimentary color from your paper.
Now using the green and purple swirls I placed under the frame and played with them once happy with your placement add a drop shadow 3,3,80,13.
Fuzzy dice element resized 50 then 70 are next place as fits the tag then add you drop shadow same as the swirls.
Now using your skull chain resize 80 place under the dice layer and using your erase tool delete any of the dice sting not necessary.
Add a drop shadow of 3,3,100,15 to the skull chain with a gradient glow color from your tube.(Same settings as above)
Now copy and paste as a new layer your winged heart element resized 50 twice. add a drop shadow and place as desired.
you may chose to add a gradient glow or not it is simple preference.
Now it's time to resize the tag and add your copyright and name.
Thank you for trying my tutorial.
Sunday, January 23, 2011
Be Mine

This tutorial is written for those with a working knowledge of PSP.
I used version 9, but any should work.
This tutorial was written entirely by me and any resemblance to any other is pure coincidental.
Materials needed:
Tube or tubes of Choice I chose the art of ©Keith Garvey which requires a license to use his work, you may purchase one @ MPT.
Scrap kit of choice I used Diagnosis Love Sick by Stacey's designs
Font: FFX Caricature
Filters needed:
Alien Skin-Eye Candy 4000 ~Gradient glow (PTU)
Lets begin.
Open a new image 750x750 you will resize later
Copy and paste a paper from your kit as a new layer I chose paper 4, now apply Graphics Plus filter Kaleidoscope
with these settings(or those of your choice):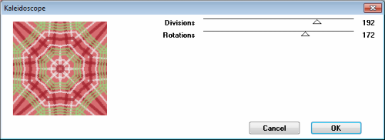

Now using your erase tool with the shape of your choice go around the edges of your paper creating the shape desired.
Now using the Pinwheel filter on Graphics Plus with the settings of your choice or you may use these: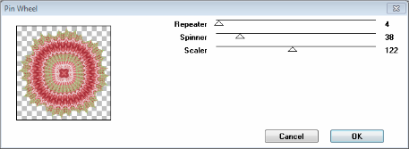

Next I used the BeMine element resized 90 with a drop shadow 3,3,100,15.
Now I used the double Heart frame with a drop shadow 1,1,100,1 and the gradient glow settings 3,25,80,thin, 100 in whatever color compliments your tube and tag.
Now using your magic wand tool click inside each heart of the frame and then click, selections, modify, expand by 3.
Copy and paste as a new layer a paper of choice from your kit I chose paper 12, Invert, delete, invert.
Now You need to take and paste as new layers the tubes of your choice adjust as desired within the frames and repeat the above invert, delete steps as needed.
Now you will move these layers under your frame layer and add the drop shadows of choice, I also added a gradient glow as well.
Now I placed my tube adjusting as desired to fit my elements, this will depend on your tube.Add a drop shadow of choice.
I added the frog princess element with a drop shadow 2,2,80,12
Next I placed doodle one with a drop shadow of 2,2,60,15 behind the adjusted paper layer then duplicate, flip and mirror
Now resize, add your copyright and your name.
Thank you for trying my tutorial !!
Friday, January 14, 2011
Live Love Laugh

This tutorial is written entirely by me. Any resemblance to any other is purely coincidental.
I wrote this using PSP9 but any version should work.This tutorial is for those with a working knowledge of PSP.
Materials needed:
Mask of Choice I used Mask 431 by Vix
Scrap kit of Choice I used My Endless Love by Stacey's Designs.
Tube or tubes of Choice I used the art of ©Jennifer Janesko you need a license to use her work you may purchase it @ Creative Design Outlet.
Open a new image 775x775 you will resize later.
Choose a paper from your kit I chose paper 12 copy and paste into your image as a new layer.
Now apply your mask layers, load/save masks, next click merge, Merge group. Now choose one or two frames from your kit, I used double frame and Frame inside of frame.
Position your frames as desired click on the inside of your frames using your wand tool click selections, modify and expand by three now paste as a new layer Your papers of choice I used papers 11 and 13.
Invert then delete, select none. Repeat the selection process with placement of your tubes and position as desired.
You may now add a drop shadow of choice, I used 2,2,100,15. Move your tube layer under your frame but above your paper. You may repeat these steps as often as needed depending on the type of frame you've used.
Do not apply the drop shadow until you've placed all of your tube layers as not to distort the manner in which the is cut when you invert and delete.
You may now add elements as desired I used ticket 1 resized 50 then I used the distort tool to rotate and position as desired. next I used the erase tool to modify the element to work with my frame.
Next I used heart wings free rotate 15 and a drop shadow of 2,2,100,15
Next I chose heart strings resized 80 moved and position under heart wings add same drop shadow as above.
You may add any elements you'd like or you can resize and add your copyright information and your name and be done.
Thank you for trying my tutorial
Other tags made with this kit:

Other tags made with this tut...

Thursday, January 13, 2011
From My Heart

This tutorial has been written entirely by me any similarity to any other is purely coincidental.
Materials needed:
Scrap kit of choice, I used From the Heart by Stacey's Designs
Mask of Choice, I chose Mask 99 by WeeScotsLass
Tube of choice, I chose the art of ©MirjaT You need a license to use her art and you can purchase it@ So Sweet Scraps.
Open a new image 750x750 you will resize later.
Pick a paper from your scrap kit I chose paper 7 copy and paste as a new layer
Apply your mask layers, load saved mask, merge, merge group. Choose an element I chose heart with strings. resized 80. Add drop shadow of choice I chose 2,2,100,12
Copy and paste your tube as a new layer add a drop shadow I used 2,2,100,15 duplicate the tube.
Choose an embellishment from your kit I chose Corner2 position on top of your tube use free rotate to position as desired.Add drop shadow of choice I used 2,2,100,12
Move your duplicate tube layer above your corner layer and using the erase tool erase any parts that you don't want above the corner piece, you may use my tag for reference.
Next add other elements I used string bow resized 70, Bow2 resized 50, position as desired or use my tag as a reference.
Next I chose journal tag resized 50 free rotate to place as desired. You may add as many or as few elements as desired. Make it your own.
Resize and add your copyright and your name. You have completed this tutorial.
Other tags made with this kit:

Other tags made with this tutorial.

Saturday, September 4, 2010
Tranquility

This tutorial is written for those that have a working knowledge of PSP.
I use version 9 but any should work.
I have written this tutorial in it's entirety and any resemblance to any other is purely coincidental
Supplies needed:
Tube of choice I'm using the work of © Steve Baier you may purchase a license to use his work at UpYourArt.
Scrap kit of choice I'm using Tranquility by Stacey's Designs
Mask(s) of choice I used Mask 124 from WeeScotLass.
Word Art by me you can download here
Font I used Whisper
OK lets begin
Open a new image 750x750
choose a paper from your kit I chose Paper 5 copy and paste as a new layer into your image
click on layers load/save mask, merge group
choose another paper I chose paper 4 copy and paste into image click layers Load/Save Mask
merge group, then click image, re-size, un-check re-size all layers and re-size the layer 90
Next I added the purple doodle and duplicate layer then mirror
Now place your tube and add a drop shadow of choice I used 2,2,100,12.00
Next I arrange the flower swag and duplicated Move the second layer up and using the erase tool erase any flower parts
around your tube to your liking
Now you can place your Word art as you like it
Next I added the Tranquility hanging heart with a drop shadow of 2,2,100,12.00
Now choose a butterfly I chose Butterfly 1 and added the same drop shadow
Now add your copyright and your name then re-size and you have completed my tutorial.
Thursday, August 19, 2010
Groovy Peace...
 This tutorial is written for those wit a working knowledge of PSP.
I used Version 9 but any version should work.
This tutorial was written entirely by me and any resemblance to an other is purely coincidental.
Supplies Needed:
Tube of Choice I chose the artwork of ©Joel Adams. You need a license to use is work, You may purchase one at CILM
Scrap kit of Choice I chose Blast from the Past by Stacey's Designs.
Mask of Choice: I chose mask 304 by WeeScotLass
Font of choice: Kingthings Slipperylip
Let's get started
Open a new image 750X750 (you will re-size later)
copy and paste one of the kit papers into your image I chose paper 9.
Now go to layers, Load/save mask and choose and apply your mask then merge, merge group
Next choose your first element I chose Pink VW2 I added a drop shadow of 2,2,100,2
Next I chose the Peace word are re-sized 60, then used free rotate to the left 25.00
then I added a drop shadow of 2,2,100,2
Next I chose the doodle and re-sized 60 and placed and arranged several (5) layers you can use my tag as a reference
then I added a drop shadow of , 3,3,100,12
Next I re-sized the Groovy word art and used the deform tool to place and rotate it I added a drop shadow of 2, 2, 100,2
then another drop shadow of 3,3,100,12.0
Next I re-sized the love word art 60 free rotated to the left 25 and used a drop shadow of 2,2,100,5
Finally You place one of the heart elements add a drop shadow of 3,3,100,11.0
Now place your tube add a drop shadow of 2, 2, 100, 2 then add a drop shadow of 3,3,100,12.0
Add your copyright, re-size and add your name you have completed this tutorial.
This tutorial is written for those wit a working knowledge of PSP.
I used Version 9 but any version should work.
This tutorial was written entirely by me and any resemblance to an other is purely coincidental.
Supplies Needed:
Tube of Choice I chose the artwork of ©Joel Adams. You need a license to use is work, You may purchase one at CILM
Scrap kit of Choice I chose Blast from the Past by Stacey's Designs.
Mask of Choice: I chose mask 304 by WeeScotLass
Font of choice: Kingthings Slipperylip
Let's get started
Open a new image 750X750 (you will re-size later)
copy and paste one of the kit papers into your image I chose paper 9.
Now go to layers, Load/save mask and choose and apply your mask then merge, merge group
Next choose your first element I chose Pink VW2 I added a drop shadow of 2,2,100,2
Next I chose the Peace word are re-sized 60, then used free rotate to the left 25.00
then I added a drop shadow of 2,2,100,2
Next I chose the doodle and re-sized 60 and placed and arranged several (5) layers you can use my tag as a reference
then I added a drop shadow of , 3,3,100,12
Next I re-sized the Groovy word art and used the deform tool to place and rotate it I added a drop shadow of 2, 2, 100,2
then another drop shadow of 3,3,100,12.0
Next I re-sized the love word art 60 free rotated to the left 25 and used a drop shadow of 2,2,100,5
Finally You place one of the heart elements add a drop shadow of 3,3,100,11.0
Now place your tube add a drop shadow of 2, 2, 100, 2 then add a drop shadow of 3,3,100,12.0
Add your copyright, re-size and add your name you have completed this tutorial.
Subscribe to:
Posts
(Atom)

Licenses I hold


CLOSED STORES:


Counter
|