My Blinkies


Stuff


Designers I CT for

Blogs I support

CU Licenses I hold


Networked Blog
Blogroll
-
AI Patriotic Patchwork Papers53 minutes ago
-
Good VS Evil - Tagger5 months ago
-
-
PTU 'Mardi Gras Queens' Tubes1 year ago
-
-
-
Blessed1 year ago
-
-
-
StellaFelice7 Taggies5 years ago
-
February 2020 New Releases5 years ago
-
-
MB&SW Masks 126 and 1275 years ago
-
MASKS #21 and 226 years ago
-
-
CA Girl Exclusive - kit7 years ago
-
-
-
PTU KIT SUMMER CITRUS9 years ago
-
STORE CLOSING DOWN SALE10 years ago
-
Gothic Ashley CT Results10 years ago
-
Rocking Shamrocks10 years ago
-
HELLO AND HAPPY NEW YEAR10 years ago
-
-
Glorious Autumn10 years ago
-
Announcement11 years ago
-
4 New Animations11 years ago
-
New Packs/Kits up in Zone Store ..11 years ago
-
New kit!! "Girlie Girl"11 years ago
-
***Dnscraps, Little Crown***11 years ago
-
"Hope for Brady" 2013 Blog Train!12 years ago
-
Lucky Me - Tagger Size12 years ago
-
Sweet Love PTU12 years ago
-
sassandswagtemps12 years ago
-
CT Tag and New Template12 years ago
-
Serg Grafik satc “All You Need is Love”12 years ago
-
Sexy Biker Babe - Kit By NAC12 years ago
-
Pirates Wanted - tag12 years ago
-
SWA is Re-Opening !12 years ago
-
Blogwear Design TOU13 years ago
-
-
♥Miraculous Moment♥14 years ago
-
-
-
-
-
-
-
-
-
-
Monday, August 20, 2012
Tutorial Featuring Sweet Sassy of Mine

This tutorial was written entirely by me, using PSP9, any resemblance to any other is purely coincidental.
This tutorial should work with any version of PSP.
This tutorial is written with the belief that you have a working knowledge of PSP, but is also suitable for beginners.
Materials you will need:
Scrap Kit of choice, I used Sweet Sassy of Mine by Wicked Princess Scraps.
Tube of choice, I used the art of ©Amy Matthews which requires a license which may be purchased at CDO.
Mask of choice, I used Tyleress_Mask 1, if this is your work, please contact me so I can credit you.
Font of choice, I used Polonaise.
Filters:
EyeCandy 4000 ~ Gradient Glow
Xero ~ Improver
AAA Filters ~ Simplifier
Let's begin.
Open a new image, 750x750
Copy and paste a paper from your kit into your image and apply your mask then merge the group.
Next place your tube as desired add a drop shadow and duplicate.
On the original layer of your tube you may add the Improver filter with these settings.

Add a gradient glow with these settings.

Back on the first duplicate of the tube add a Gaussian blur of 3 and change the properties to overlay.
Begin placement of your elements. If you are using the vanity element take the second duplicate of your tube and re-size,
30 and using your deform tool adjust to fit within the mirror of the vanity.
Add simplifier with these settings,

Adjust the transparency between 80-90 to suit you.
Place you other elements around your tube as desired, or you may use my tag as a guide.
Use the deform tool and drop shadow as needed and add a gradient glow if desired to highlight some of your elements.
Manual Color corrector can also help to blend your elements if needed.
Once you have achieved the desired result, re-size, add your copyright and name.
You have now completed my tutorial, thank you for trying it out.
Here are EXTRAS.
Enchanting Tutorial featuring Enchanted (PTU)

This tutorial was written entirely by me, using PSP9, any resemblance to any other is purely coincidental.
This tutorial should work with any version of PSP.
This tutorial is written with the belief that you have a working knowledge of PSP, but is also suitable for beginners.
Materials you will need:
Scrap Kit of choice, I used Enchanted by Sweet Dreams Scraps.
Tube or tubes of choice, I used the art of ©Keith Garvey which requires a license which may be purchased at his store Garv-Girls.
Mask of choice, I used NikMask27, and you may find it here for purchase.
Font of choice, I used Almibar Swash 1.
Filter:
Xero ~ Porcelain
Let's begin.
Open a new image, 750x750
Choose a paper from your kit and apply your mask then merge the group.
Place a multi-frame from your kit, position as desired and add a drop shadow. I used 4,4,60,12.
Using your magic wand tool, click inside open area of the frame, then selections, modify, and expand by 15.
Copy and paste one of your tubes or the area of the tube you'd like to appear in the frame, invert, delete and add your drop shadow.
Move the tube layer beneath the frame layer.
Duplicate tube layer, then add a Gaussian blur of 3 and change properties to overlay.
Go back to the original tube layer and colorize to match a color of choice from your kit.
Repeat these steps for each opening on your frame either using different tubes or different areas of your chosen tube.
Place your tube as desired adding a drops shadow of choice or those settings above.
Apply these Porcelain settings or those of your choosing.

Duplicate this layer, and add a Gaussian Blur, change your properties to Soft light.
Begin placing your elements from your kit using as many or as few as desired. Adding drop shadows as needed.
Once you've achieved what you like, re-size your tag, add your copyright and your name and you've completed my tutorial.
Thank you for trying out my tutorial.
Here are some EXTRAS.
Friday, August 17, 2012
Spilt MIlk Tutorial with extras (PTU)

This tutorial was written entirely by me, using PSP9, any resemblance to any other is purely coincidental.
This tutorial should work with any version of PSP.
This tutorial is written with the belief that you have a working knowledge of PSP, but is also suitable for beginners.
Materials you will need:
Scrap Kit of choice, I used Spilt Milk by Crafted by Gina.
Tube of choice, I used the art of ©Elias Chatzoudis which requires a license which may be purchased at his store Elias Art Shop .
Mask of choice, I used Mask2_Kreations8787, if this is your work please contact me so I can credit you.
Font of choice, I used Janda As Long As You Love Me.
Preset Shapes: Tear and Splat or inkblot.
Filters:
Eye Candy 5 Impact ~ Glass
Eye Candy 5 Nature ~ Drip
Xero ~ Radiance
Let's begin.
Open a new image, 750x750
Copy and paste a paper from your kit apply your mask and merge the group.
Place your tube add a Drop shadow, I used 3,3,60,12.
Duplicate and add a Gaussian blur of 3 and change properties to soft light.
On original tube layer use Radiance with these settings:

Begin to place your elements adding a drop shadow as desired or needed.
To create your spills you will need a splat preset and a tear preset.
Using your preset shape tool draw out the size of your "tear/drip" then use EC5N~Drip with these settings:

Then you add the EC5I~Glass with these settings:

Add your drop shadow then place as needed. You may use my tag as a guide.
You will use these same EC5I~Glass settings for your "Splat/puddle" after you've drawn it.
Add a drops shadow once you've achieved the desired effect.
Continue to place your elements in front, behind and around your tube.
Add drop shadow of choice, and use the Gaussian blur technique to brighten and accentuate some of your elements.
Once you've achieved your desired effect, re-size add your copyright and name.
You have now completed my tutorial, thank you for trying it out.
Here are some EXTRAS.
Sunday, August 12, 2012
Dream Free tutorial featuring Dance Free

This tutorial was written entirely by me, using PSP9, any resemblance to any other is purely coincidental.
This tutorial should work with any version of PSP.
This tutorial is written with the belief that you have a working knowledge of PSP, but is also suitable for beginners.
Materials you will need:
Scrap Kit of choice, I used Dance Free by Crafted by Gina.
Tube of choice, I used the art of ©PinUpToons which requires a license which may be purchased at CDO.
Mask of choice, I used 187, if this is your work please contact me so I can credit you.
Font of choice, I used MA Sexy.
Filter:
Xero-Porcelain
Let's begin.
Open a new image, 750x750
Choose a paper from your kit and apply the mask and merge the group.
Place a frame from your kit and add a drop shadow of choice. I used 4,4,55,12.
Using your magic want tool click within the frame to select.
Expand the selection by 14 (Selection, Modify, Expand).
Choose different paper from your kit and paste, then invert and delete.
Move the paper layer beneath the frame layer.
Place your tube beneath the frame layer and duplicate. Move the duplicate layer above the frame.
Use your erase tool to make the tube come "out" of the frame.
Duplicate this layer and add a Gaussian Blur of 3, then change Properties to overlay.
On the original duplicate layer of the tube(the one just above the frame) apply Porcelain with these settings or those that fit your tube.

Begin to place your elements above and below the framed/paper layers.
You may use my tag as a guide or go your own way.
Brighten the hues of different elements by using the Gaussian Blur method above.
Add your drop shadows as desired, and use the erase and free rotate to help with arrangement of elements.
Re-size your elements as needed between 35-60, use your deform tool to assist in this as well.
Re-size, add your copyright and your name and you have completed my tutorial.
Thank you for giving this tutorial a go.
Here are EXTRAS.
Feel the Beat Tutorial with Extras

This tutorial was written entirely by me, using PSP9, any resemblance to any other is purely coincidental.
This tutorial should work with any version of PSP.
This tutorial is written with the belief that you have a working knowledge of PSP, but is also suitable for beginners.
Materials you will need:
Scrap Kit of choice, I used Feel the Beat by Abstract Creations.
Tube of choice, I used the art of ©Ismael Rac which requires a license which may be purchased at XeracX.
Mask of choice, I used 177, if this is your work please contact me so I may credit you.
Font of choice, I used Sick Capital Vice.
Filters:
EyeCandy 4000- Corona
Xero- Radiance
Let's begin.
Open a new image, 750x750
Choose a paper and apply your mask and merge the group.
Choose a Silhouette element from your kit and apply the same mask then merge the group.
Place a musical note element from your kit then add Corona in a complementary color to your paper.
Use settings of choice or you may use theses settings.

Place your tube and add a drop shadow of choice. I used 5,5,60,15.
Apply the mask and merge group, rename tube layer so as not to get confused.
Duplicate this layer colorize to a hue to match your paper, add a Gaussian blur of 3 change properties to overlay.
Go back to the original tube layer and add Radiance with your setting of choice or you may use these.

On the colorized tube layer add Corona with the same settings previously used then change transparency to 70 or setting of choice.
Choose a cityscape from your kit and place beneath the original mask layer, duplicate and mirror, then merge.
Add a drop shadow.
Begin to place your elements using the deform and erase tools to assist in arranging.
Re-sizing also helps with element placement I re-sized between 30-70 depending on the element.
Perspective shift can be used as well for some of the elements to adjust to fulfill your vision.
Adding Corona using different shades and random settings also helps distinguish your elements.
Once you have achieved the desired result, re-size, add your copyright and name.
You have completed my tutorial, thank you for trying it out.
Here are EXTRAS.
Dark Cinnamon tutorial with extras.

This tutorial was written entirely by me, using PSP9, any resemblance to any other is purely coincidental.
This tutorial should work with any version of PSP.
This tutorial is written with the belief that you have a working knowledge of PSP, but is also suitable for beginners.
Materials you will need:
Scrap Kit of choice, I used Dark Cinnamon by Honored Scraps.
Tube of choice, I used the art of ©Keith Garvey which requires a license which may be purchased at his store Garv-Girls .
Mask of choice, I used 176, if this is your work, please contact me so I can credit you.
Font of choice, I used Janda Shine Your Light On Us.
Filter:
Xero- Radiance
Eyecandy 4000 Gradient Glow & Corona
Let's begin.
Open a new image, 750x750
Start with glitters from your kit, arrange to your liking using as many or as few layers as you'd like, then merge the layers.
Copy and paste a new paper into your image, and apply your mask, then merge the group.
Place your tube and add a drop shadow. Use your erase and smear tool to soften hard edges.
Duplicate add a Gaussian Blur of 5 and change the properties to overlay.
Begin choosing your elements. Re-size as needed. I re-sized between 20 - 60 depending on the element.
Use your deform tool to help get the desired size and to rotate.
Use your deform tool to help get the desired size and to rotate.
Use the same Gaussian Blur on the lantern of choice from your kit,
and Radiance on the birds and Butterfly you can click random until you achieve the desired result.
Or you could use my settings:

Add gradient glow, and corona on setting of your choice to highlight the elements of choice.
If you need guidance for the settings you may use the settings I used and use my tag as a guide.


Re-size, add your copyright and your name and you have completed my tutorial, thank you for trying it.
Here are EXTRAS.
Saturday, August 11, 2012
Emotional Wreck Tutorial with Extras

This tutorial was written entirely by me, using PSP9, any resemblance to any other is purely coincidental.
This tutorial should work with any version of PSP.
This tutorial is written with the belief that you have a working knowledge of PSP, but is also suitable for beginners.
Materials you will need:
Scrap Kit of choice, I used Emotional Wreck by Creations By Jo.
Tube of choice, I used the art of ©MichiArt which requires a license which may be purchased at Michi Art .
Mask of choice, I used 120-kris, if this is your work, please contact me so I can link to you.
Font of choice, I used Levi Brush.
Filter:
Xero- Radiance
EyeCandy 4000- Gradient Glow & Corona
Mura Meister- Copies
Let's begin.
Open a new image, 750x750
Choose a paper and apply your mask and merge your group.
Add a gradient glow of choice or you can use these settings.


Place a close up of your tube, and apply copies with these settings.

Add Radiance with these settings.

Now colorize this layer with a hue to match your paper, and apply the same mask.
change the transparency to 35 or the setting of your choice.
Place your tube as desired, and add a drop shadow and your gradient glow. I used DS settings, 5,5,65,15.
Duplicate add a Gaussian blur of 3 and change the properties to overlay.
Go back to the original tube layer and apply Radiance with the previous settings.
Now place a word art from your kit and add Corona with these settings

then add a gradient glow of choice.
Duplicate add the same Gaussian blur as before and change properties to overlay.
You may now start placing your elements beneath your tube layer, adding drops shadow and gradient glows as desired.
Use your deform tool to help adjust your element sizes along with re-size.
Once your are satisfied with element placement, re-size, add your copy right and name.
You have now completed my tutorial, thank you for trying it.
Here are EXTRAS.
Sleepy Time Tutorial featuring So Sweet Dreams

This tutorial was written entirely by me, using PSP9, any resemblance to any other is purely coincidental.
This tutorial should work with any version of PSP.
This tutorial is written with the belief that you have a working knowledge of PSP, but is also suitable for beginners.
Materials you will need:
Scrap Kit of choice, I used So Sweet Dreams by DnScraps.
Tube of choice, I used the art of ©Lacy Clagg which requires a license which may be purchased at CDO .
Mask of choice, I used 0mask046_LT, and if it is your creation, please contact me so I can credit you.
Font of choice, I used In the Arms of Sleep.
Filter:
Xero- Mistifier
EyeCandy 4000- Corona & Gradient Glow
Let's begin.
Open a new image, 750x750
Open a paper from your kit and apply a your mask (Layers, Load/Save Mask) then merge your group (Merge, Merge group).
Apply Xero Mistifier with these settings.

Choose a frame from your kit and add a drop shadow of choice (I used 4,4,50, 16) then add Corona with these settings.

Place a ribbon from your it beneath the frame layer and use the deform tool to adjust to suit you.
Duplicate the ribbon layer and mirror.
Place your tube and add a drop shadow of choice Then add your gradient glow with these settings.


Duplicate and add a Gaussian Blur of 4 and adjust properties to overlay.
Begin placing your elements as desired or you may use my tag as a guide.
As you are placing your elements, add Mistifier to them and adjust transparency between 70 to 90 for a more dreamy quality.
If you need to adjust a color of an element to match your tag better you should use the manual color corrector to achieve your desired effect.
Re-size your tag, add your copyright and name and you have completed my tutorial.
Thank you for trying out my tutorial.
Here are EXTRAS.
What A Beach Extras

These awesome extras were made with the wonderful kit What a Beach by A Simply Sassy Scrap Creation. You can find this awesome kit at Whimsical Divas Boutique.
You can download the extras here.
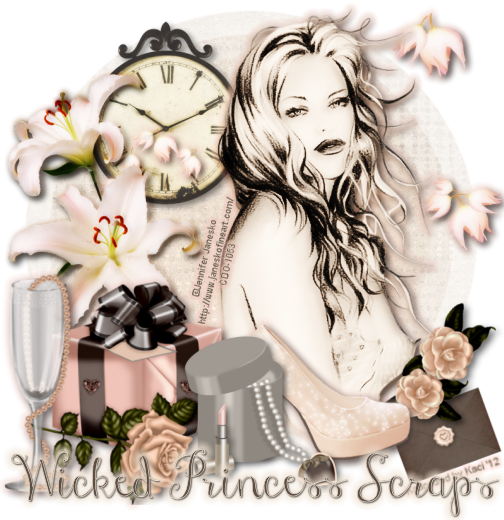
Eternity Tutorial with extras
This tutorial was written entirely by me, using PSP9, any resemblance to any other is purely coincidental.
This tutorial should work with any version of PSP.
This tutorial is written with the belief that you have a working knowledge of PSP, but is also suitable for beginners.
Materials you will need:
Scrap Kit of choice, I used Eternity by Wicked Princess Scraps .
Tube of choice, I used the art of ©Jennifer Janesko which requires a license which may be purchased at CDO .
Mask of choice, I used 000_Becky_Mask018, unfortunately the creator's site is gone. Try googling it.
Font of choice, I used Janda Stylish Script.
Filters:
Xero- Radiance
EyeCandy 4000- Gradient Glow
Let's begin.
Open a new image, 750x750
Choose a paper from your kit, and apply your mask of choice then merge group.
Place your tube, add a drop shadow of choice I used (5,5,60,15).
If there are hard edges smooth them using your smear and erase tools.
Artistic effects then Sepia Toning, choose a hue that compliments your kit and tube.
Add a drop shadow, and duplicate.
On the original tube layer apply Xero Radiance with these settings.

Then add your Gradient Glow with these settings


On the duplicate tube layer apply a Gaussian blur of 4 then change properties to overlay.
Using a clock from your kit place as desired below the tube layers but above the group layer, add a drop shadow of choice.
Apply Xero Radiance with the same settings used on the tube layer.
Adjust the transparency between 70 & 80 depending on the color you chose for your paper.
Place a flower from your kit add your drop shadow then duplicate.
On the duplicate layer do a manual color correction to a color in the mid-range that blends well with the sepia chosen for your tube and your kit.
Add a Gaussian blur of 4 and change the Properties to overlay.
Re-size and place elements to compliment your tube. Add drop shadows of choice as desired.
Add a Gaussian Blur and change properties as it suits the elements you choose.
You may also add a Gradient Glow as desired as well with the same settings as above.
Adjust transparency on some of your elements to help achieve the effect you'd like.
Re-size, add your copyright and your name and you are done.
Thank you for trying my tutorial.
Here are some EXTRAS.
Friday, August 10, 2012
Ladies Night Out Tutorial featuring Do it Like a Lady (Extras)

This tutorial was written entirely by me, using PSP9, any resemblance to any other is purely coincidental.
This tutorial should work with any version of PSP.
This tutorial is written with the belief that you have a working knowledge of PSP, but is also suitable for beginners.
Materials you will need:
Tube of choice, I used the art of ©Barbara Jensen which requires a license which may be purchased at Barbara Jensen Tubes.
Mask of choice, I used Vix_Mask451, and you may get it from VixPSP.
Font of choice, I used Sverige Script Decorative.
Filter:
Xero Radiance
EyeCandy4000 Gradient Glow
Let's begin.
Open a new image, 750x750
Choose a paper from your kit, then add a Gaussian blur of 9.
Apply your mask of choice and merge group.
Place your tube as desired with a drop shadow of choice. (I used 3,3,60,12)
If your tube has a "flat" or "sharp" edge that you'd like softened use your smear tool to help blend it with your mask.
Duplicate tube layer and add a Gaussian blur of 4 then change the property to overlay.
On the original tube layer apply Xero Radiance with these settings.

Place your Cityscape above the mask group layer and using your deform tool adjust to fit your needs.
Add a drop shadow and a gradient glow to compliment the paper you've chosen.
Apply the same mask used previously.
Begin placing your elements as desired adding a drop shadow and a gradient glow as you wish.
Re-size elements between 20-50 depending on your vision.
Add Radiance with a random setting to distinguish elements of choice.
You may add wording on the curve if you'd like but it isn't necessary.
To do so use your preset Ellipse tool and set it to circle draw a circle the side you'd like.
Click on your text tool and move to the edge of the circle until the curve appears then click and type your words.
Use rotation of text until position is what you want then convert to raster and add a gradient glow as desired.
Re-size, add your copyright and you name and you have completed my tutorial.
Thank you for trying out my tutorial.
Here are some EXTRAS.
Thursday, August 9, 2012
Look Some Pig Tutorial with extras.

This tutorial was written entirely by me, using PSP9, any resemblance to any other is purely coincidental.
This tutorial should work with any version of PSP.
This tutorial is written with the belief that you have a working knowledge of PSP, but is also suitable for beginners.
Materials you will need:
Scrap Kit of choice, I used Some Pig by Crafted by Gina .
Tube of choice, I used the art of ©Zindy S.D. Nielsen which requires a license
which may be purchased at Zindy Zone.
Font of choice, I used Sofia.
Filters:
Mura's Copies
Xero Radiance
Let's begin.
Open a new image, 750x750
Choose a flower from your kit and re-size 30.
Apply Muras Copies with these settings.

Re-size 150 and add a drop shadow of choice if desired (I used 3,3,40,10).
Using your magic wand tool click inside the frame layer to select. Modify, expand 10.
Place your tube layer and invert then delete.
You may add a drop shadow if desired and use your Xero Radiance on a setting that compliments your tube and frame choices. I used this one.

Place a foliage of choice from your kit beneath the flower frame layer and add your same drop shadow.
Now using a complimentary flower or flowers place above the flower frame, adding the drop shadow of choice.
Use duplicate layers, your deform tool and erase tool the blend your flowers as desired.
Using other elements from your kit re-size between 30-75 and place as desired using variations in your drop shadow for effect.
Re-size, add your copyright and your name.
You have now completed this tutorial.
Thank you for trying my tutorial.
Here are some EXTRAS for those that like them.
Freebie Cluster from Valentine Arrows

This freebie cluster is from Valentine Arrows by Wicked Princess Scraps that can be found exclusively here.
You may also find the art of Industrial Aardvark @ TPP.
Here are some extras made with the art and the cluster.

Subscribe to:
Posts
(Atom)

Licenses I hold


CLOSED STORES:


Counter
|