My Blinkies


Stuff


Designers I CT for


Blogs I support

CU Licenses I hold


Networked Blog
Blogroll
-
-
Still around and still busy2 weeks ago
-
Midnight Garden Blog Train Freebie!3 weeks ago
-
Dayz of Summer - Tagger10 months ago
-
-
Country Christmas 20202 years ago
-
Blessed2 years ago
-
-
-
StellaFelice7 Taggies6 years ago
-
February 2020 New Releases6 years ago
-
-
MB&SW Masks 126 and 1276 years ago
-
MASKS #21 and 227 years ago
-
-
CA Girl Exclusive - kit8 years ago
-
-
-
PTU KIT SUMMER CITRUS10 years ago
-
STORE CLOSING DOWN SALE11 years ago
-
Gothic Ashley CT Results11 years ago
-
Rocking Shamrocks11 years ago
-
HELLO AND HAPPY NEW YEAR11 years ago
-
-
Glorious Autumn11 years ago
-
Announcement12 years ago
-
4 New Animations12 years ago
-
New Packs/Kits up in Zone Store ..12 years ago
-
New kit!! "Girlie Girl"12 years ago
-
***Dnscraps, Little Crown***12 years ago
-
"Hope for Brady" 2013 Blog Train!13 years ago
-
Lucky Me - Tagger Size13 years ago
-
Sweet Love PTU13 years ago
-
sassandswagtemps13 years ago
-
CT Tag and New Template13 years ago
-
Serg Grafik satc “All You Need is Love”13 years ago
-
Sexy Biker Babe - Kit By NAC13 years ago
-
Pirates Wanted - tag13 years ago
-
SWA is Re-Opening !14 years ago
-
Blogwear Design TOU14 years ago
-
-
♥Miraculous Moment♥15 years ago
-
-
-
-
-
-
-
-
-
-
Wednesday, October 19, 2011
Midnight (PTU)

This tutorial was written entirely by me, any resemblance to any other is purely coincidental.
PSP 9 was used while writing this tutorial, but any version should work.
Materials needed:
Scrap kit of Choice: I used Midnite Blue by Honored Scraps
Tube of choice: I used the art of ©Kurama Phoenix, you need a license to use her work and it
may be purchased here.
Mask of Choice: I used Mask 6 by me that you can find here on my blog.
Cloud brushes: I used the wonderful brushed of ©Suzanne Wolcott which may be found here.
Font of Choice: I used Chivalry Decorative.
Filters: Lokas 3D, EyeCandy 4000~Gradient Glow, Alien skin EyeCandy5 Nature~Smoke
Let's begin.
Open a new image 750x750, you will resize later
Choose a paper from your kit, I chose paper 3.
Now apply your mask, by clicking Layers, Load/Save Mask, Load mask from disk. Now Merge, Merge group.
Place your tube of choice right in the middle of the mask layer, you will adjust as you add your elements.
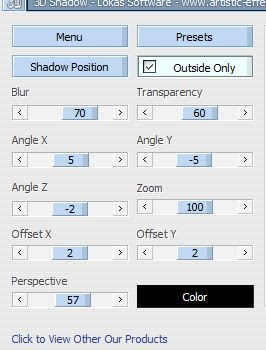
Add a gradient glow of choice, to suit your tag, then add your Lokas 3D Shadow.These are the settings I used.
Next position a ribbon from your kit behind your tube as desired,I used folded Ribbon1 resized 60.
Add a Lokas 3D Shadow, then open your AS EC 5 smoke.
Apply these settings,
or those that suit your vision.
Add a moon element from your kit Resized 50.
Under the tube layer and add a Lokas 3D shadow.
Next create a new raster between the tube layer and the moon layer and choose a color from your moon element and make it your foreground and stroke choice.
Using your cloud brushes as you'd like create a cloud effect to compliment both the moon layer and the tube layer.
You can add a gradient glow with a color from your tube if desired, but it isn't necessary. It does help the cloud layer stand out a bit more though.
Now choose complimentary elements from your kit, and place as desired, You may use my tag as a guide. I used the Blue cushion resized 50,
and the flowers also resized 50, all with the Lokas 3D shadow. Use your erase tool to help with placement of the flowers if you use them.
Duplicate the flower layers and move the duplicate layers to the top and erase those parts you don't want to show, to make a blended effect.
Now if you choose you may add some Smoke to your tube layer if desired, but again not necessary unless it suits your tag.
Now resize, add your copyright information and your name and you will have completed my tutorial.
Thank you.
Tuesday, October 18, 2011
No Angel (PTU)

This tutorial was written entirely by me. Any resemblance to any other is purely coincidental.
PSP9 was used while writing this tutorial, but any version should work.
Materials needed:
Tube of choice, I used the art of ©Enys Guerrero. You need a license to use this art and one may be purchased @ DSI.
Scrap Kit of Choice, I used the kit Fallen Angel by CBJ Scraps.
Mask of choice, I used one by Horseplay's Pasture (number 20) which may be found here.
Font of choice, I used Affair (PTU)
Filters used: Lokas 3D, Eyecandy 4000 Gradient Glow.
Animation shop if you'd like to animate.
Let's begin.
Open a new image 750x750, you will resize later.
Next choose a paper from the kit, I used paper 6, copy and paste as a new layer into your image and apply your mask of choice.
Layers, Load/Save Mask, Load mask from disk, ok. Then merge your mask group, click Merge, merge group.
Next choose a glitter or a bling from your kit, I used the Glitter Bling resized 40. Duplicate this layer and flip it then mirror.
Adjust your glitter as desired, or you may use my tag as a guide. Now place your tube add your
Lokas 3D with these settings
and duplicate.
Move the duplicate level beneath the original,and x the original from site for the moment.
Apply the same mask you used on the paper to your tube duplicate,then merge the group this will allow for a beautiful blend where you like it.
Now un x your original tube and using your erase tool, eras those bits that are too harsh to help the blending with the duplicate layer.
Next take a flower from your kit I used the Glittered fabric Rose and added a Gradient glow with these settings,

then add Lokas with the previous settings.
Next using the No Angel element resized 40 and using the manual color corrector change the shade of the element to a complementary color from your tube.
Add your Gradient glow same as before and your Lokas3D or a different drop shadow of choice and position as desired beneath the flower or as desired within your tag.
Now using the beaded string resized 50, place beneath the No Angel and the flower element.
You may use the deform tool to achieve the desired effect, and the erase tool for whatever bits don't suit you.
Next take the key element and add both the gradient glow and the Lokas 3D as desired ( I used the same settings as before).
Position the key beneath the flower, but above the string layer and position as desired, again you may use my tag as a reference if you'd like.
Now take a butterfly element and position as desired adding the gradient glow as before.
Resize, add your copyright and your name and you have completed this tutorial.
If you'd like to add some subtle animation you may continue.

Now x out all the layers except your Beaded String, No Angel Element, key element, Glittered rose and the butterfly elements.
Now merge visible and duplicate the merged layer three times.
Using your magic wand tool go to the first layer and click around the roses glittered edges do as much or as little as you'd like.
Next go to the Adjust, Add/Remove Noise, Add noise. Set your noise to Random, and adjust the percentage to 40%.
It should look like this:
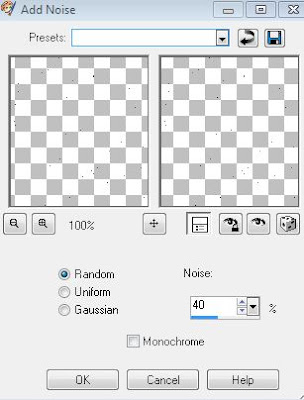

Repeat this with each layer but changing the noise percentage on each layer, one layer to 60% and one layer to 80%.
Now x out 2 of the three layers, and coy merged and place as a new animation in Animation shop. Now repeat this with each layer, pasting after current frame until you have three frames.
check your animation to make sure it looks the way you'd like and save.
You have now completed my tutorial. Thank you.
I'd love to see any results you'd like to share, for me to post here on my blog.
Zindy Snags
Here are some Zindy Snags for anyone that likes them.
CBJ scraps Color pop Green kit was used in this lovely.
Enjoy!


Saturday, October 15, 2011
On the road to recovery...
It has been an eventful few weeks. First I sprain my hip and am bed ridden for a week.... and no I don't know how I did that. Then while recovering from that injury I start to cough. I've been diagnosed with Bronchitis, and down with that now for 2 weeks. I have no energy and have barely been able to care for my family, let alone do anything on the computer. I'm trying to get caught up now so I can get some tutorials written and posted. I'm looking forward to feeling better and getting that done. I was missing posting here so I wanted to keep everyone updated. Blessed be.
Subscribe to:
Posts
(Atom)

Licenses I hold


CLOSED STORES:


Counter
|